You will need …


Enter the search term and press "ENTER" .
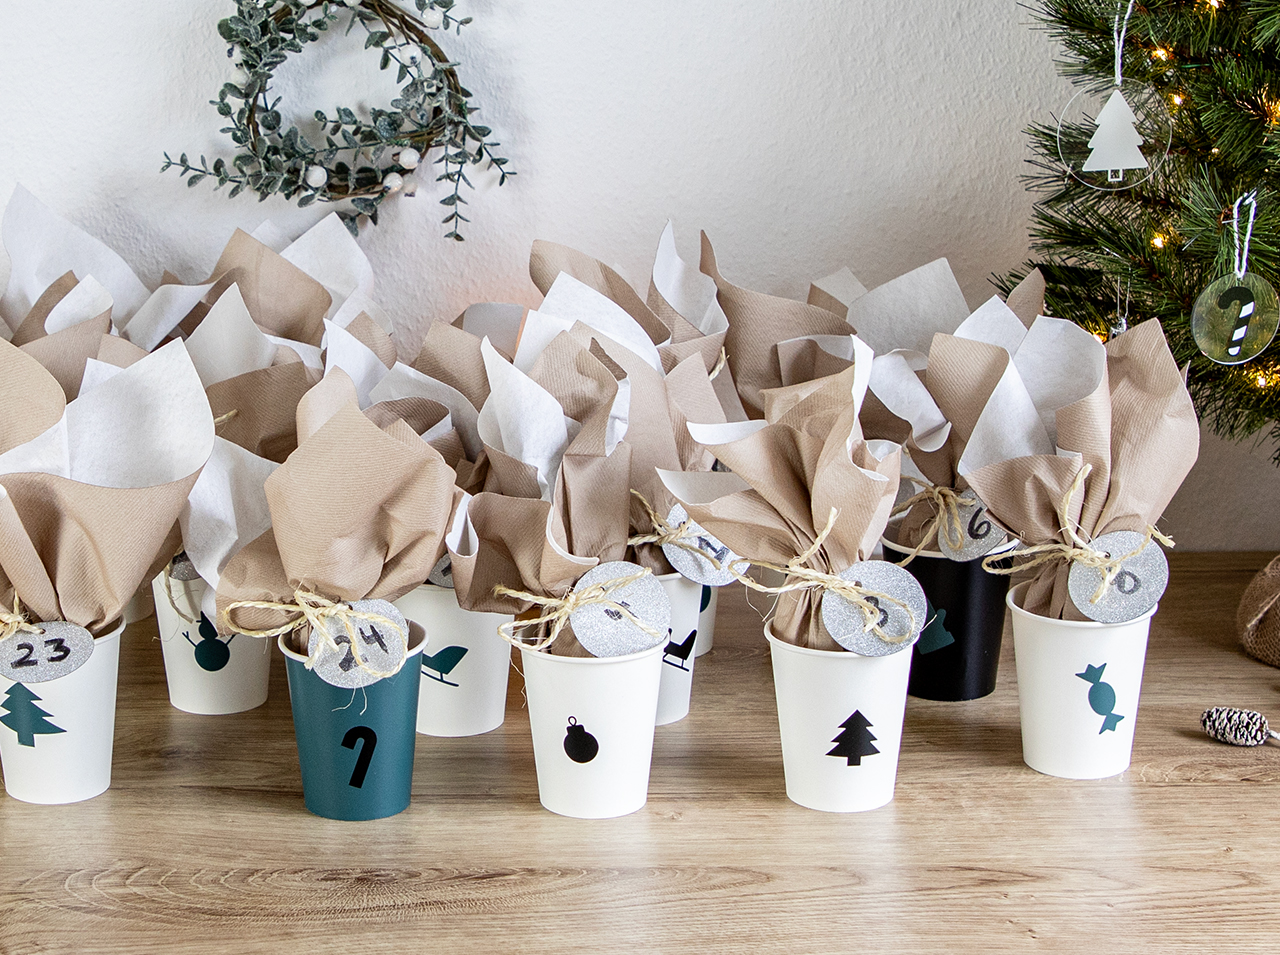
DIY Advent calendar: 24 paper cups full of surprises & fun!
Project from Angelina - 0 CommentsA glance at the calendar: December 1 is fast approaching! High time to think about Advent calendars. Who am I going to gift an Advent calendar to and what should it look like? Of course, you don’t want to just buy a ready made one, but to create a unique item yourself. After all, receiving a DIY calendar is the best way for the recipient to enjoy the countdown to Christmas with that extra thrill.
That’s why we have a clever crafting idea for you – using white paper cups as the basis to conceal the daily surprises! Paper cups? Yes, exactly, but decorated with Christmas elements using the three d-c-fix® adhesive films in modern green, glittering silver and matt black. But that, of course, is not all…
Feel like crafting to make someone happy? Then get started now!
- d-c-fix® Uni matt black adhesive foil
- d-c-fix® Uni matt mallard green adhesive foil
- d-c-fix® glitter silver adhesive foil
- d-c-fix® application kit with smoothing blade and utility knife
- Pencil
- Black felt-tip pen
- Scissors
- 24 paper cups
- Cardboard box
- Napkins (large)
- String
- Hole punch
Let’s go!
With this tutorial, making your creative DIY Advent calendar is simple:
 Preparation
You have everything you need? Then get started!
 Step 1
Take all three sheets of adhesive foil and draw circles and Christmas shapes on the backs.
 Step 2
Cut out the various shapes using scissors.
 Step 3
To decorate the plain cups, peel off the backing paper from the foil elements.
 Step 4
Position the decorative elements onto the outside of the cup and press them down firmly.
 Step 5
You want to completely cover the outside of the cup? Take an extra cup, cut it open at the adhesive seam, remove the base and use the body of the cup as a template for cutting out the adhesive foil.
 Step 6
Next, accurately place a napkin into the center of each cup so that you have an even overhang above the rim of the cup to tie up the napkins.
 Step 7
Now you can fill the cups with surprises of your choice.
 Step 8
Draw outlines of the cardboard box sides on the back of the Glitter silver adhesive foil, cut out the foil pieces and press them firmly down onto the outside of the cardboard box using a smoothing blade.
 Step 9
Now draw 24 circles onto the cardboard box.
 Step 10
Cut out the circles.
 Step 11
Label the cut-out circles with the numbers 1 to 24.
 Step 12
Then punch a hole into each circle above the number.
 Step 13
Finally, thread the cardboard circle onto a piece of string and use it to tie the napkin closed with some overhang above the string.
You’re done!


Post A Comment
Preparation time
10 min
Execution
45 min
Difficulty level
Easy
Costs
Average
Projects you might like

No Comments